

- If you happen to have a roll of .16 gauge copper wire handy, you’ll appreciate this beginner’s project, the Bead Curtain. Make some WOUND WIRE RONDELS on your large miniature screwdriver, and be sure to cut them FLUSH ON BOTH ENDS.
- Cut some 3″ long .16 gauge CORE WIRES, and be sure to FLUSH CUT ON BOTH ENDS.
- Now make a GENEROUS loop on one end of your core wire, and bring the end ALL THE WAY to close it against itself.
- TUG BACK on the main body of the core wire so that the loop is a perfect lollipop shape.
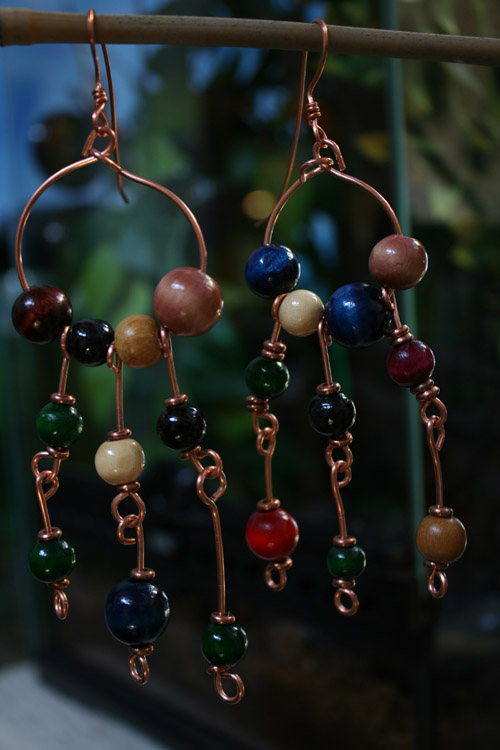
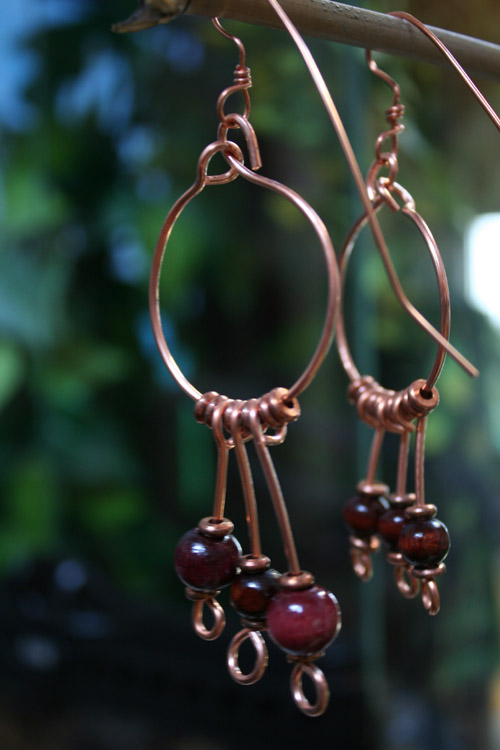
- Drop one or two WIRE RONDELS onto the core wire, then your wooden bead or beads, then one or two more wire rondels. If you used one, then use one again. If you used two, then use two to match on the other side of the main bead, as show in photo. You can combine any colors, shapes and sizes of wooden beads you want to have on there, the crazier and more random, the better. Make sure the beads don’t weigh too much, because the earring mustn’t be too heavy to actually wear.
- Now make a CLOSING LOOP on the other end of the core wire, and you have a complete ELEMENT, which can be combined with other ELEMENT DROPS, as shown in photo.
Side view of simple beginner’s .16 gauge Tribal Earring project. - You can open the loop TO THE SIDE to preserve the loop’s perfect lollipop shape, and slip it onto another element.
- Make the HOOP, the main body of the earring, by making a LOLLIPOP LOOP at one end of a 3″ long .16 gauge wire, FLUSH CUT ON BOTH ENDS, making sure to roll the closing loop over the first loop, as shown in photo.
- Feed a WOODEN SEPARATOR BEAD of whatever size you like onto the HOOP, then add one wire drop element, then another separator bead, another element, another separator bead, another element, another separator bead, until you have THREE WIRE DROPS and FOUR WOODEN BEAD SEPARATORS on your HOOP.
- Now make two .20 gauge ancient-style ear wires as shown, and attach them by opening the .16 gauge loops, ALWAYS TO THE SIDE. Never open a loop by making it bigger.
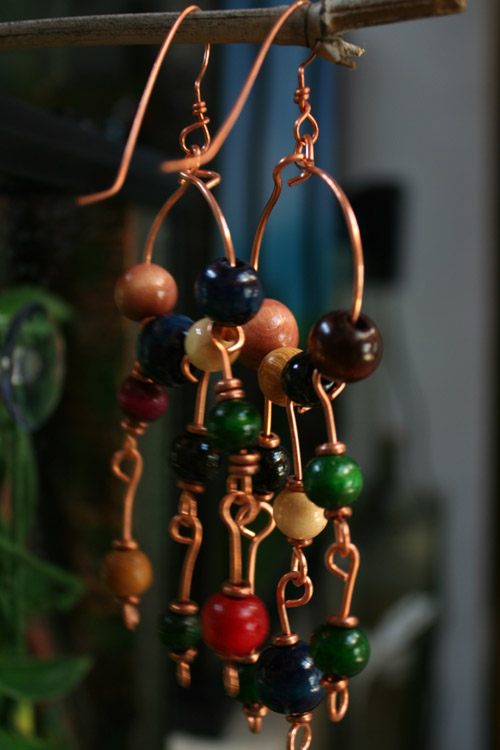
Here’s a simple project, although it looks complicated. Pay close attention, and learn the easy way:
- Cut a 3″ length of .16 gauge copper wire and FLUSH CUT BOTH ENDS. Now make another one just like it.
- Make a LARGE, GENEROUS LOOP on one end of each wire.
- Holding the loop of one wire down on the LARGE HOOP FORM, make the copper wire bend in a circle around the form, to create a HOOP shape. Do the same with the other wire.
- Now to make the DROP WIRES, cut TEN 3″ lengths of .16 gauge copper wire and FLUSH CUT BOTH ENDS.
- Form a LARGE GENEROUS LOOP at one end of each of the DROP WIRES. Make absolutely certain that the loops don’t stick out on either side — they should join perfectly with themselves to make a perfect LOLLIPOP LOOP.
- Now create a second loop on the other end of each drop, making absolutely certain that the second loop is 90 DEGREES against the first loop. They MUST be criss-crossed like this to function, hang, and move correctly.
- Now make EIGHT COILS, exactly 8 winds per coil, as shown in the photo above. Make absolutely certain that the ends of the coils are flush-cut and trimmed to avoid catching on clothing or skin. File and buff or polish as necessary to get rid of any sharp points or edges.
- Make TWO ANCIENT STYLE EAR WIRES and set them aside.
- Feed the DROP WIRES onto the MAIN HOOP as shown, using the home-made coil beads as shown in photo, and make the CLOSING LOOP to keep them in place.
- Attach the EAR WIRES by bending the TOP OVER-LOOP to the side slightly, just enough to accommodate the ear wire. Do not over-bend the top loop, or risk visible damage and scarring to the metal.
- Now you can hammer down or flatten the SIDES of the loops, never the top or bottom of the loop, on the closing loop, drops or any other loop you want to enlarge or make flashy with irregular surfaces that are produced by hammering. You can use the ball side of the hammer to create stippled or inversion surfaces or any other effect you know how to produce with the ball-peen hammer and anvil.
The whole idea of this project is to make a set of earrings without a single store-bought bead, so resist the urge to change things and DON’T ADD store-bought beads to this build.
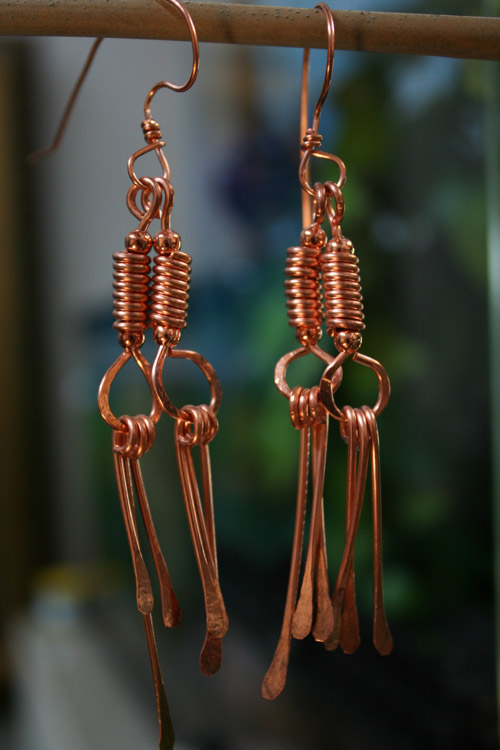
To make Project IV, the Ashanti Spiral Drop, follow this simple set of instructions exactly and to-the-letter:
- Cut FOUR 3″ lengths of .16 gauge copper wire and FLUSH CUT BOTH ENDS of each wire.
- Form a LARGE, GENEROUS LOOP on one end of each wire.
- Cut FOUR 10″ lengths of .16 gauge copper wire and create FOUR spiral wound wire beads on your LARGE miniature screwdriver.
- Feed ONE of your home-made spiral wound tube beads onto EACH of the four Core or Drop wires you just prepared with a loop at one end. You can use a LARGE HOLD copper bead here at considerable extra expense, as shown in photo. Until you’re making money at this, it’s not worth the extra expense, and adds nothing to the primitive look you’re trying to achieve.
- Make a much larger CLOSING LOOP on the bottom of the drop wires, and flatten them with your ball-peen hammer and anvil, to give them some size and sparkle.
- Now cut TEN pieces of .16 gauge wire, of varying lengths anywhere from 2 1/2″ to 3 1/2″ depending on taste, luck and slippage of the cutter, to make your paddle wires.
- Form a loop at the FLUSH END of each of the ten paddle wires, making absolutely certain that each is EXACTLY fitted so as to leave NO trace of sharp edge or points.
- Holding each paddle wire correctly — with the loop between thumb and forefinger, held vertical, like a miniature gun — hammer out the SHARP END into a PERFECT TEARDROP shape, with no sharp edges, meaning don’t hammer too much. Very thin copper gets very sharp very fast.
- Now turn each of the loops on each of the copper paddles and fit them onto the larger hammered-out BOTTOM LOOPS of the TEN DROP WIRES, and close each loop as you fit it on. You can decide to fit the paddles on all the same way, or differently, as you prefer. Tribally speaking, pay no attention to Western Design Concepts and don’t whitewash the front lawn fence to make it all square and neat and orderly. A little randomity never hurt anyone.
- Now add your ear wires to the top loops, and your project is complete. I used .16 gauge wire here to make the ear wires, because I wanted this piece on exhibit, so elected to go with the more flamboyant and less wearable heavier ear wires. When you make a pair of exhibit earrings, there’s no reason not to use the heavier wire.
Please note that in the exhibit earrings, I did use the copper rounds to top and bottom off the spiral tube beads. Special Large Hole copper beads are available by Special Order, for your exhibit grade pieces, but take my word for it, you don’t need them, and for my tribal projects, I’ve stopped using them.
The Spiral Spin is something I picked up on the very first day of wire work. It’s ridiculously simple, yet you might have a hard time making these without a few secrets, to wit:
- Cut a 10″ to 13″ length of .16 gauge copper wire, and FLUSH CUT BOTH ENDS.
- Form a TOP LOOP with a big, generous curve from the largest end of your round needle-nosed pliers. Make it big and brave.
- Now HOLD the LOOP under your thumb, on the LARGE HOOP FORM, so that the wire goes ACROSS the hoop form.
- Leaving a “HEAD” of about ONE INCH or about 2.5 cm ON THE FLUSH CUT END, carefully WIND THE WIRE around the HOOP FORM to make a TIGHT, PERFECTLY FORMED COIL, as shown in photo. The coil can be as many or as few winds as you like.
- Determine how long the wires should be to make the number of loops you prefer. The number does make a Quantum Difference and can be very effective at anywhere from 5 1/2 turns to 10 1/2 turns.
- LEAVE A TAIL more or less equal in length to the HEAD.
- The TAIL will be SHARP, not FLUSH-CUT like the HEAD. HAMMER out the sharp end to form a PERFECT TEAR-DROP SHAPED PADDLE, as shown in photo.
- Be sure to work BOTH EARRINGS at the same time, performing each step first on one, then on the other, earring, to assure that they will be more or less the same, within very wide and generous limits.
- Now make ear wires and attach them as shown. I used .16 gauge for the ear wires, and wound them with my short 1 1/2 winds mini-coil, just for looks. You can use .20 gauge ear wires, which you’ll HAVE TO wrap. .20 gauge wire doesn’t tolerate a simple loop — it has to be wrapped. .16 gauge is tough and resistant to warp, so it can be formed into a loop and the loop will fairly consistently survive the battering that worn jewelry has to withstand. People are kinda rough with their wearables, you may have noticed.
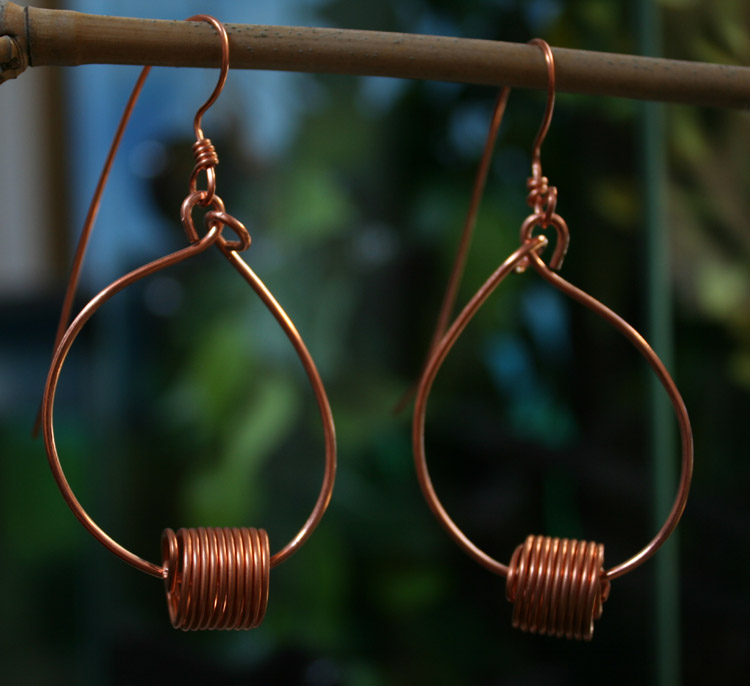
Nothing could be simpler than this Tribal Hoop & Bangle Earring Set:
- Cut a 5″ length of .16 gauge wire and FLUSH CUT BOTH ENDS.
- Form a nice big, generous TOP LOOP at one end.
- Place the TOP LOOP under your thumb on the HOOP FORM, and form the hoop, allowing the TAIL of the wire to run past the loop. It should go past the loop about two inches or slightly more.
- Hammer out the loop if you like, otherwise leave it alone. Make sure that the loop is well-formed and that it doesn’t stick out on either side of the hoop or leave any sharp edges.
- Cut SIX pieces of .16 gauge copper DROP WIRES about 3″ long.
- Form LOOPS at the top of each of the six pieces of DROP WIRE.
- Make a half dozen single or double wind coils and make certain that both ends of each home-made copper bead is FLUSH CUT and safe to use.
- Thread on your wooden bead.
- Add the same number of home-made coil copper beads on the other side of the wooden bead.
- FORM A LOOP at the bottom of EACH OF THE SIX DROP WIRES.
- Make two ear wires and add them as shown in photo. You can make them separately and add them by SIDE-OPENING the TOP LOOPS of the two HOOPS. I made mine with .16 gauge because these are DISPLAY EARRINGS, and I wanted the ear wires to show more dramatically. You can use .20 gauge wire or commercial ear wires if you like.
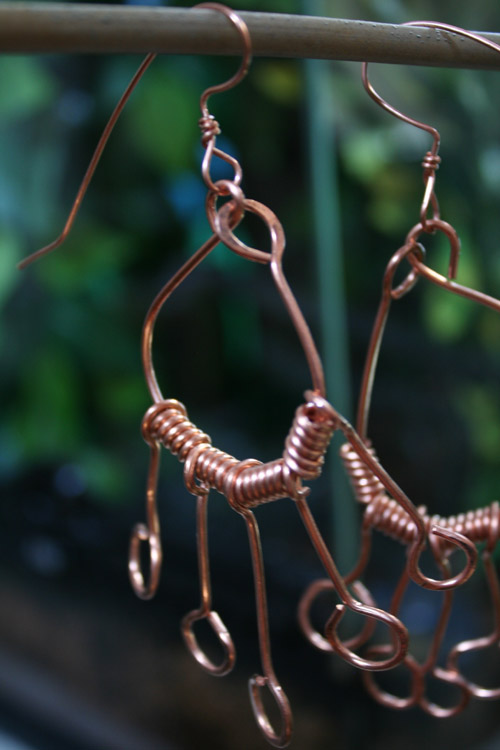
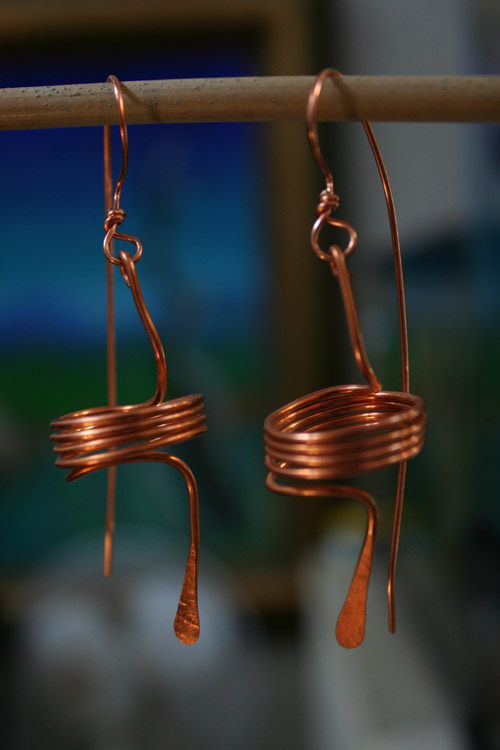
Mind-Bending Coils Suspended Midair create this mysterious effect.
Here’s one I invented back in 1964, when there were no bead shops anywhere. Your big CORE HOOPS are made as usual, ear wires are the same as always. What’s different about this is the Mystery Coil at the bottom center. They are made by holding down a small loop at the inner center, and running the wire around the SMALL HOOP FORM, and bending the small loop inward to the center of the coil, making a center-threading coil bead, as shown in photo. Once you figure it out, it’s just a matter of practice.
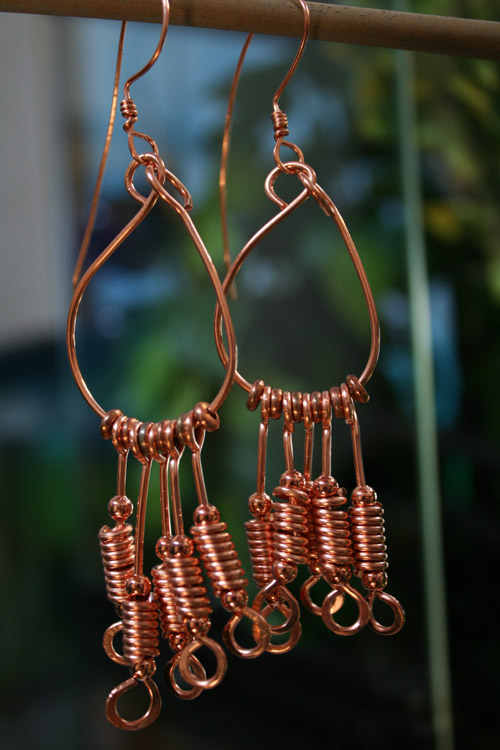
These are a pair of Ashanti Style copper drop earrings. They are not light. Here is the short-form recipe, although there’s a world of learning in these simple earrings:
- Form two MAIN HOOPS as shown in the photo above.
- Make two ear wires and set them aside.
- Cut TEN 3″ to 4″ lengths of .16 gauge copper wire and FLUSH CUT BOTH ENDS.
- Form a BIG GENEROUS LOOP at the top of each of the ten drop wires you just prepared, and set them aside for the moment.
- Cut TEN 10″ to 12″ lengths of .16 gauge copper wire.
- Form TEN eight-wind HOME-MADE COIL BEADS, and FLUSH CUT BOTH ENDS OF EACH WIRE TUBE BEAD you made.
- OPTIONAL: You can add LARGE HOLE copper rounds here, as I did in the photo, or leave them off.
- Feed the COIL BEADS onto the DROP WIRES and close off the bottom end by forming VERY LARGE LOOPS.
- Hammer the SIDES OF THE LOOPS, not the bottoms, as shown in photo. STUDY the photo to see exactly where you should hammer a loop. NEVER hammer them in the center. ALWAYS hammer loops on the SIDES ONLY, and be GENTLE. Hammering too much causes sharp edges.
- Make 12 SEPARATOR BEADS out of .16 gauge by winding them on your LARGE miniature screwdriver and FLUSH-CUTTING THEM out of a larger coil. You can leave room for cutting by winding two tight coils, leaving a space, winding two more tight coils, etc.
- Using your separator beads, thread your DROPS onto the HOOPS as shown.
- Add the ear wires, and you’re done.
I have a LOT MORE projects for you, but these were the ones that don’t require ANY STORE BOUGHT METAL BEADS. It should keep you busy for the next few days.
I’ll explain more at the ICW this morning. YOU’RE INVITED!!!
See You At The Top!!!
gorby